

How To Create Server For Android App

- Selected Reading
- UPSC IAS Exams Notes
- Developer's Best Practices
- Questions and Answers
- Effective Resume Writing
- HR Interview Questions
- Computer Glossary
- Who is Who
Client-Server Programming in Android
This example demonstrate about Client-Server Programming in Android
Need Server and Client Project
Server
Step 1 − Create a new project in Android Studio, go to File ⇒ New Project and fill all required details to create a new project.
Step 2 − Add the following code to res/layout/activity_main.xml.
<?xml version = "1.0" encoding = "utf-8"?> <RelativeLayout xmlns:android = "http://schemas.android.com/apk/res/android" xmlns:tools = "http://schemas.android.com/tools" android:layout_width = "match_parent" android:layout_height = "match_parent" android:layout_margin = "16dp" tools:context = ".MainActivity"> <TextView android:id = "@+id/tvIP" android:layout_width = "wrap_content" android:layout_height = "wrap_content" android:textAppearance = "@style/Base.TextAppearance.AppCompat.Medium" /> <TextView android:id = "@+id/tvPort" android:layout_width = "wrap_content" android:layout_height = "wrap_content" android:layout_below = "@+id/tvIP" android:textAppearance = "@style/Base.TextAppearance.AppCompat.Medium" /> <TextView android:id = "@+id/tvConnectionStatus" android:layout_width = "match_parent" android:layout_height = "wrap_content" android:layout_below = "@+id/tvPort" android:textAppearance = "@style/Base.TextAppearance.AppCompat.Medium" /> <TextView android:id = "@+id/tvMessages" android:layout_width = "match_parent" android:layout_height = "wrap_content" android:layout_above = "@+id/etMessage" android:layout_below = "@+id/tvConnectionStatus" android:inputType = "textMultiLine" android:textAppearance = "@style/Base.TextAppearance.AppCompat.Medium" /> <EditText android:id = "@+id/etMessage" android:layout_width = "match_parent" android:layout_height = "wrap_content" android:layout_above = "@+id/btnSend" android:hint = "Enter Message" android:inputType = "text" /> <Button android:id = "@+id/btnSend" android:layout_width = "match_parent" android:layout_height = "wrap_content" android:layout_alignParentBottom = "true" android:text = "SEND" /> </RelativeLayout>
Step 3 − Add the following code to src/MainActivity.java
package com.server.myapplication.server; import android.annotation.SuppressLint; import android.net.wifi.WifiInfo; import android.net.wifi.WifiManager; import android.os.Bundle; import android.support.v7.app.AppCompatActivity; import android.view.View; import android.widget.Button; import android.widget.EditText; import android.widget.TextView; import java.io.BufferedReader; import java.io.IOException; import java.io.InputStreamReader; import java.io.PrintWriter; import java.net.InetAddress; import java.net.ServerSocket; import java.net.Socket; import java.net.UnknownHostException; import java.nio.ByteBuffer; import java.nio.ByteOrder; @SuppressLint("SetTextI18n") public class MainActivity extends AppCompatActivity { ServerSocket serverSocket; Thread Thread1 = null; TextView tvIP, tvPort; TextView tvMessages; EditText etMessage; Button btnSend; public static String SERVER_IP = ""; public static final int SERVER_PORT = 8080; String message; @Override protected void onCreate(Bundle savedInstanceState) { super.onCreate(savedInstanceState); setContentView(R.layout.activity_main); tvIP = findViewById(R.id.tvIP); tvPort = findViewById(R.id.tvPort); tvMessages = findViewById(R.id.tvMessages); etMessage = findViewById(R.id.etMessage); btnSend = findViewById(R.id.btnSend); try { SERVER_IP = getLocalIpAddress(); } catch (UnknownHostException e) { e.printStackTrace(); } Thread1 = new Thread(new Thread1()); Thread1.start(); btnSend.setOnClickListener(new View.OnClickListener() { @Override public void onClick(View v) { message = etMessage.getText().toString().trim(); if (!message.isEmpty()) { new Thread(new Thread3(message)).start(); } } }); } private String getLocalIpAddress() throws UnknownHostException { WifiManager wifiManager = (WifiManager) getApplicationContext().getSystemService(WIFI_SERVICE); assert wifiManager ! = null; WifiInfo wifiInfo = wifiManager.getConnectionInfo(); int ipInt = wifiInfo.getIpAddress(); return InetAddress.getByAddress(ByteBuffer.allocate(4).order(ByteOrder.LITTLE_ENDIAN).putInt(ipInt).array()).getHostAddress(); } private PrintWriter output; private BufferedReader input; class Thread1 implements Runnable { @Override public void run() { Socket socket; try { serverSocket = new ServerSocket(SERVER_PORT); runOnUiThread(new Runnable() { @Override public void run() { tvMessages.setText("Not connected"); tvIP.setText("IP: " + SERVER_IP); tvPort.setText("Port: " + String.valueOf(SERVER_PORT)); } }); try { socket = serverSocket.accept(); output = new PrintWriter(socket.getOutputStream()); input = new BufferedReader(new InputStreamReader(socket.getInputStream())); runOnUiThread(new Runnable() { @Override public void run() { tvMessages.setText("Connected\n"); } }); new Thread(new Thread2()).start(); } catch (IOException e) { e.printStackTrace(); } } catch (IOException e) { e.printStackTrace(); } } } private class Thread2 implements Runnable { @Override public void run() { while (true) { try { final String message = input.readLine(); if (message ! = null) { runOnUiThread(new Runnable() { @Override public void run() { tvMessages.append("client:" + message + "\n"); } }); } else { Thread1 = new Thread(new Thread1()); Thread1.start(); return; } } catch (IOException e) { e.printStackTrace(); } } } } class Thread3 implements Runnable { private String message; Thread3(String message) { this.message = message; } @Override public void run() { output.write(message); output.flush(); runOnUiThread(new Runnable() { @Override public void run() { tvMessages.append("server: " + message + "\n"); etMessage.setText(""); } }); } } } Step 4 − Add the following code to androidManifest.xml
<?xml version = "1.0" encoding = "utf-8"?> <manifest xmlns:android = "http://schemas.android.com/apk/res/android" package = "com.example.myapplication"> <uses-permission android:name = "android.permission.ACCESS_WIFI_STATE" /> <uses-permission android:name = "android.permission.ACCESS_NETWORK_STATE" /> <uses-permission android:name = "android.permission.INTERNET"/> <application android:allowBackup = "true" android:icon = "@mipmap/ic_launcher" android:label = "@string/app_name" android:roundIcon = "@mipmap/ic_launcher_round" android:supportsRtl = "true" android:theme = "@style/AppTheme"> <activity android:name = ".MainActivity" android:label = "Server"> <intent-filter> <action android:name = "android.intent.action.MAIN" /> <category android:name = "android.intent.category.LAUNCHER" /> </intent-filter> </activity> </application> </manifest>
Client
Step 1 − Create a new project in Android Studio, go to File ⇒ New Project and fill all required details to create a new project.
Step 2 − Add the following code to res/layout/activity_main.xml.
<?xml version = "1.0" encoding = "utf-8"?> <RelativeLayout xmlns:android = "http://schemas.android.com/apk/res/android" xmlns:tools = "http://schemas.android.com/tools" android:layout_width = "match_parent" android:layout_height = "match_parent" android:layout_margin = "16dp" tools:context = ".MainActivity"> <EditText android:id = "@+id/etIP" android:layout_width = "match_parent" android:layout_height = "wrap_content" android:hint = "IP-Address" android:inputType = "text" /> <EditText android:id = "@+id/etPort" android:layout_width = "match_parent" android:layout_height = "wrap_content" android:layout_below = "@+id/etIP" android:hint = "Port No" android:inputType = "number" /> <Button android:id = "@+id/btnConnect" android:layout_width = "match_parent" android:layout_height = "wrap_content" android:layout_below = "@+id/etPort" android:layout_gravity = "center" android:layout_marginTop = "16dp" android:text = "Connect To Server" /> <TextView android:id = "@+id/tvMessages" android:layout_width = "match_parent" android:layout_height = "wrap_content" android:layout_above = "@+id/etMessage" android:layout_below = "@+id/btnConnect" android:inputType = "textMultiLine" android:textAppearance = "@style/Base.TextAppearance.AppCompat.Medium" /> <EditText android:id = "@+id/etMessage" android:layout_width = "match_parent" android:layout_height = "wrap_content" android:layout_above = "@+id/btnSend" android:hint = "Enter Message" android:inputType = "text" /> <Button android:id = "@+id/btnSend" android:layout_width = "match_parent" android:layout_height = "wrap_content" android:layout_alignParentBottom = "true" android:text = "SEND" /> </RelativeLayout>
Step 3 − Add the following code to res/layout/MainActivity.java.
package com.client.myapplication.client; import android.annotation.SuppressLint; import android.os.Bundle; import android.support.v7.app.AppCompatActivity; import android.view.View; import android.widget.Button; import android.widget.EditText; import android.widget.TextView; import java.io.BufferedReader; import java.io.IOException; import java.io.InputStreamReader; import java.io.PrintWriter; import java.net.Socket; @SuppressLint("SetTextI18n") public class MainActivity extends AppCompatActivity { Thread Thread1 = null; EditText etIP, etPort; TextView tvMessages; EditText etMessage; Button btnSend; String SERVER_IP; int SERVER_PORT; @Override protected void onCreate(Bundle savedInstanceState) { super.onCreate(savedInstanceState); setContentView(R.layout.activity_main); etIP = findViewById(R.id.etIP); etPort = findViewById(R.id.etPort); tvMessages = findViewById(R.id.tvMessages); etMessage = findViewById(R.id.etMessage); btnSend = findViewById(R.id.btnSend); Button btnConnect = findViewById(R.id.btnConnect); btnConnect.setOnClickListener(new View.OnClickListener() { @Override public void onClick(View v) { tvMessages.setText(""); SERVER_IP = etIP.getText().toString().trim(); SERVER_PORT = Integer.parseInt(etPort.getText().toString().trim()); Thread1 = new Thread(new Thread1()); Thread1.start(); } }); btnSend.setOnClickListener(new View.OnClickListener() { @Override public void onClick(View v) { String message = etMessage.getText().toString().trim(); if (!message.isEmpty()) { new Thread(new Thread3(message)).start(); } } }); } private PrintWriter output; private BufferedReader input; class Thread1 implements Runnable { @Override public void run() { Socket socket; try { socket = new Socket(SERVER_IP, SERVER_PORT); output = new PrintWriter(socket.getOutputStream()); input = new BufferedReader(new InputStreamReader(socket.getInputStream())); runOnUiThread(new Runnable() { @Override public void run() { tvMessages.setText("Connected\n"); } }); new Thread(new Thread2()).start(); } catch (IOException e) { e.printStackTrace(); } } } class Thread2 implements Runnable { @Override public void run() { while (true) { try { final String message = input.readLine(); if (message ! = null) { runOnUiThread(new Runnable() { @Override public void run() { tvMessages.append("server: " + message + "\n"); } }); } else { Thread1 = new Thread(new Thread1()); Thread1.start(); return; } } catch (IOException e) { e.printStackTrace(); } } } } class Thread3 implements Runnable { private String message; Thread3(String message) { this.message = message; } @Override public void run() { output.write(message); output.flush(); runOnUiThread(new Runnable() { @Override public void run() { tvMessages.append("client: " + message + "\n"); etMessage.setText(""); } }); } } } Step 4 − Add the following code to androidManifest.xml
<?xml version = "1.0" encoding = "utf-8"?> <manifest xmlns:android = "http://schemas.android.com/apk/res/android" package = "com.client.myapplication.client"> <uses-permission android:name = "android.permission.INTERNET" /> <uses-permission android:name = "android.permission.ACCESS_NETWORK_STATE" /> <application android:allowBackup = "true" android:icon = "@mipmap/ic_launcher" android:label = "@string/app_name" android:roundIcon = "@mipmap/ic_launcher_round" android:supportsRtl = "true" android:theme = "@style/AppTheme"> <activity android:name = "com.client.myapplication.client.MainActivity" android:label = "Client"> <intent-filter> <action android:name = "android.intent.action.MAIN" /> <category android:name = "android.intent.category.LAUNCHER" /> </intent-filter> </activity> </application> </manifest>
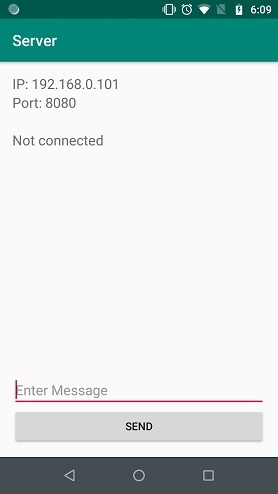
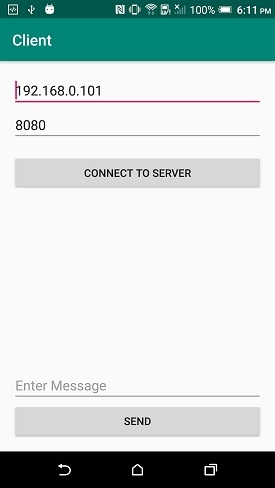
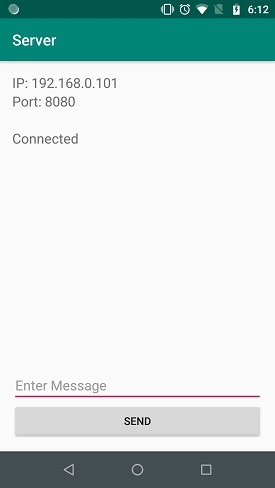
Let's try to run your both server and client application. I assume you have connected your actual Android Mobile device with your computer. To run the app from android studio, open one of your project's activity files and click Run![]() icon from the toolbar. Select your mobile device as an option and then check your mobile device which will display your default screen –
icon from the toolbar. Select your mobile device as an option and then check your mobile device which will display your default screen –
Server:-
Client:-
Server:-
Click here to download the project code

Published on 16-Apr-2019 08:30:26
- Related Questions & Answers
- Client Server Computing
- Client server connection in Java
- Operating Systems Client/Server Communication
- MySQL Client Server-Side Help
- Structure of a Client Server System
- What is a client-server system?
- XMLRPC server and client modules in Python
- What is Client-Server Architecture in Computer Network?
- Installing SAP Sybase client on Windows server 2012 R2
- Difference between Client-Server and Peer-to-Peer Network
- What is client/server network and types of servers?
- Reverse a string in C/C++ using Client Server model
- How can we maintain session between Web Client and Web Server?
- How to Setup SSL for MySQL Server and Client on Linux
- What is the Client-Server Framework for Parallel Applications in Computer Architecture?
How To Create Server For Android App
Source: https://www.tutorialspoint.com/client-server-programming-in-android
Posted by: pullinsciarger.blogspot.com
0 Response to "How To Create Server For Android App"
Post a Comment