

How To Lock Word Logo And Addres As Letterhead Template
No thing how adept you are, working on a layout can get pretty stressful sometimes. The reason could be as nerve-wracking as an approaching borderline or as simple equally an epitome you keep moving by mistake.
Well, we may not be able to help you with your deadline, but nosotros tin can definitely aid you continue the epitome in place.
Fortunately, MS Word offers several ways to lock your images, so you don't waste matter time putting them back in identify over and over once more.

Now, there are nearly half dozen ways to lock an prototype in Word.
six Ways to Lock an Prototype in MS Word
- Lock an Image Using Motion picture Anchor Tool
- Lock an Image Using Picture show Content Tool
- Lock an Image Using Restrict Editing Choice
- Lock an Paradigm Using Watermark Tool
- Lock an Image Using Fill Effects
- Lock an Image Using Header and Footer
For images that should be wrapped either in-line or tightly with the text, the first 3 methods are highly recommended. The offset and 2nd methods are the most convenient means to prepare the position of the image. These methods permit you to edit the text beside or around your image with ease. Although you lot can also edit your text easily with the 3rd method, it can get a bit tricky as it requires yous to set a password.
On the other hand, if you want to lock a background epitome or a company logo in place, the concluding three methods should come in handy for you. They allow you to edit your document without the take a chance of accidentally moving or deleting your image.
Having said all that, here'southward everything y'all need to know to lock an image in MS Word.
Method 1: Lock an Paradigm Using Flick Ballast Tool
This method is the simplest fashion to lock an prototype into position. However, it is not equally permanent a fix compared to the other methods. It just allows y'all to edit your text while retaining the current arrangement of the image.
Hither are the steps on how you can do that.
Stride one: Open an MS Word certificate.
First things first, open a Discussion document. If you lot are currently working on one, feel gratuitous to use it. Don't be agape about messing information technology up because you lot tin easily undo the changes you're going to do from here on out. Yous tin can also create a new document if you don't have a file fix yet.

Step 2: Insert an image.
Once you already have an opened document, go to the Insert tab. Nether the Illustrations grouping, simply click on Pictures. Upon doing so, an Insert Picture dialog box will launch in the middle of your screen. Locate the image you want to use from your drive and click Insert to go along.

Footstep 3: Select the text wrapping mode.
Now that you take a picture, the next thing to do is correct-click on it. From the horizontal dropdown menu that pops out, select Wrap Text. Select the text wrapping way you want to use among the options that show except for In Line with Text. This style will brand your image sit on the text line and so automatically accommodate one time you type in or edit the main text.
For this example, we'll be using the Behind Text style.

Pace 4: Fix the position of the image.
Repeat the step to display the Wrap Text menus over again and select Fix Position on Page. Upon doing and then, y'all will notice that an anchor with a lock icon will appear most the image. At present you tin edit your text without being worried about moving the images effectually it.

Congratulations! Yous've successfully locked an image in MS Discussion.
Method two: Lock an Image Using Picture Content Command
This method won't merely enable yous to protect your image from being accidentally moved but too foreclose it from being deleted by error. This method provides the most convenient solution for this concern.
To do this, hither's what yous should do.
Step one: Open a Word file.
Before anything else, we outset need to open a Word certificate. You can simply use the certificate you lot are currently working on if you take any. Otherwise, you can create a new document earlier proceeding to the next steps.

Step two. Enable the Developer tab.
By default, the Developer tab is not visible. Then, get to the File menu and click Options.


This volition display the Word Options dialogue box. You should run across a list of options on the left side of the window. Click Customize Ribbon. Once y'all've done that, the dialogue box will brandish two sets of lists. In the list on the right, under the Chief Tabs, tick the checkbox adjacent to Developer.
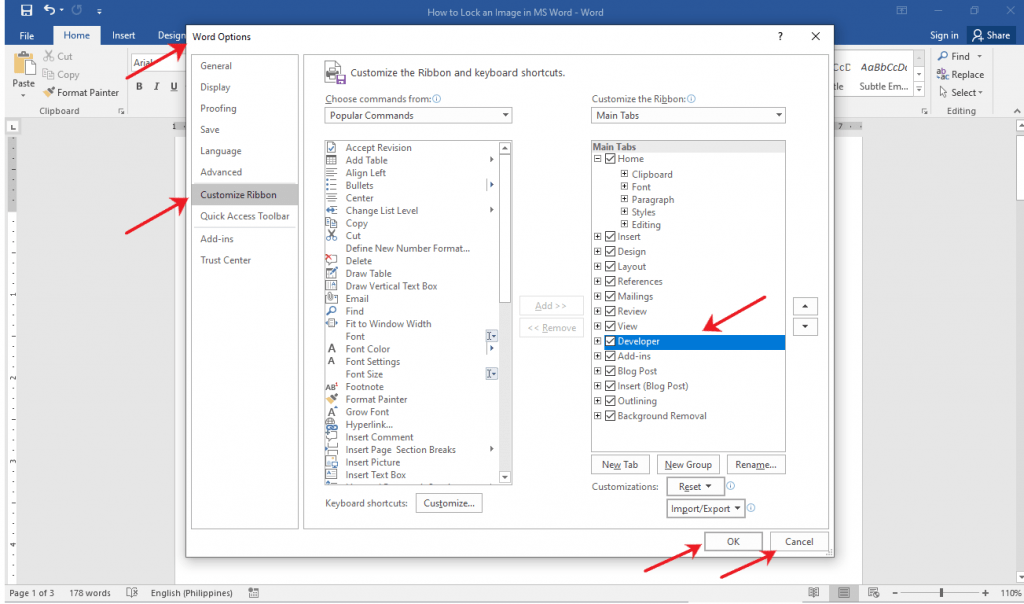
Click on the OK button to save the changes. Otherwise, click the Cancel button.
Step 3: Insert Flick Content Command.
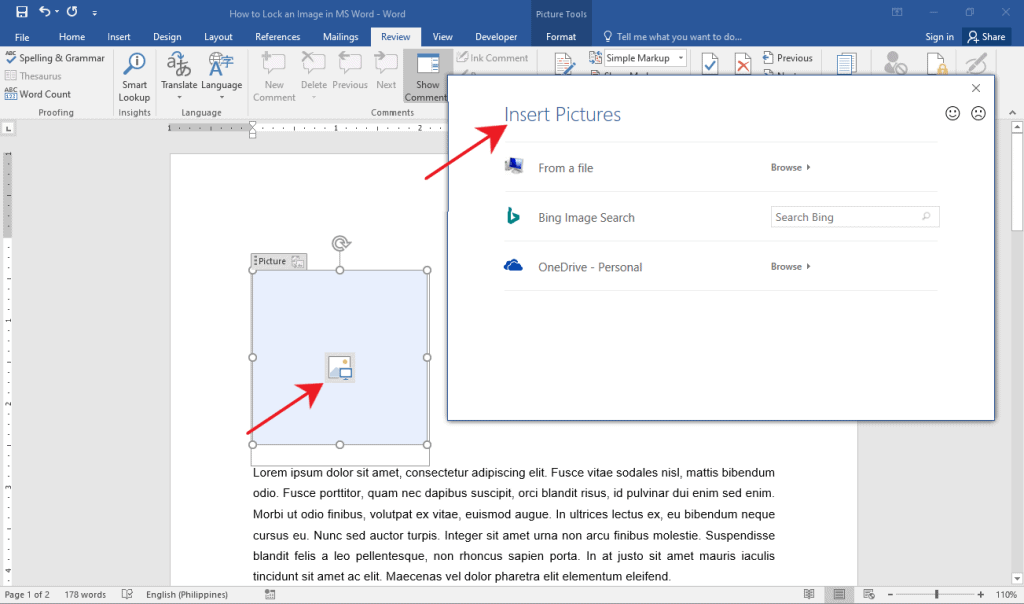
Under the Developer tab on the Ribbon, select the Picture Content Control under Controls group. This volition insert a Motion picture Content Control on whichever location your cursor is located. Make sure that you place your cursor to where y'all want the image to exist placed.

Stride 4: Insert an Image.
Now that you lot have a Moving picture Content Control on your document, proceed to insert the image that y'all want to use. To do this, simply click on the film icon right in the middle of the Picture Content Command. Doing so will launch the Insert Motion-picture show dialog box. This will permit you select which location your images volition exist coming from. Choose the images y'all want to use, and so click Insert to go along.
Amazing! You've successfully inserted a secured image using Picture Content Control in MS Word.
Method 3: Lock an Image Using Restrict Editing Option
The 3rd method will crave yous to protect your image with a password. There'south no need to worry though, as removing its password is every bit easy as enabling it. Take note, however, that enabling the Restrict Editing selection volition lock the document as a whole.
Hither's how you lot tin can set upward a countersign-protected image.
Pace ane: Open a Word certificate.
Commencement, open up upwards a Word certificate. You lot tin use the file you are currently working on if it's already opened. Don't worry about messing the certificate up as you can easily undo the changes you lot brand.

Pace 2: Insert an image.
If you already accept a flick loaded on your document, yous can skip this step. Only if y'all don't accept one even so, only follow the steps on how to insert an image in Method i.
Step 3: Enable Restrict Editing.
Now that you take a picture show ready, go to the Review tab and select Restrict Editing. This will launch the Restrict Editing side panel on the right side of your screen.

Now, click on the Yes, Offset Enforcing Protection button found at the bottom of the carte du jour. This will prompt a dialog box that volition require yous to ready a password for the file. Type in the password that you lot adopt, so click OK.

Remember the password that yous used so y'all'll be able to edit or delete the image later. Also, note that enabling Restrict Editing tool will prohibit you to edit the entire document.
In that location you have information technology! You successfully locked an image using the Restrict Editing tool in MS Give-and-take.
Method 4: Lock an Prototype Using Watermark Tool
If you want to edit your document without the hassle of accidentally dragging your groundwork, then this method is perfect for you.
Here's how y'all tin practise that.
Step i: Open a Give-and-take file.
Starting time upwardly, open a Give-and-take document that we can edit. Feel free to use your own personal document if yous already have it open. Don't be agape to mess it up because yous can easily revert whatever unwanted changes.

Step ii: Insert your image as a Watermark
Get to the Pattern tab and click the Watermark button under the Page Background group. From the list of options beneath, select Custom Watermark. This volition launch a dialog box.

From in that location, select Picture Watermark. Click on the Select Picture button. Doing so, will prompt an Insert Picture show dialog box. Locate and import the moving picture y'all want to use.

Voila! You lot've successfully used the Watermark tool to lock an paradigm in MS Word.
Method five: Lock an Image Using Fill Effects
This method is another selection to finish your image from constantly getting selected while you're editing text.
Hither are the steps on how to use fill furnishings to lock your image.
Step 1: Open a Word document.
Just like in art, y'all can't create a painting without a canvass. So earlier anything else, you kickoff need to open a Word file. If you already have 1 open, feel free to use that as you follow the adjacent steps. Alternatively, yous can also create a new document.

Pace 2: Select make full effects on the page color option.
On your opened document, go to the Design tab. Click the Page Color drop-down carte du jour and select Make full Effects. This will prompt a dialog box in the eye of the screen.

On the dialog box, get to the Picture show tab and click the Select Picture button. Locate the prototype y'all want to employ and so click the OK button.

Wonderful! Yous've but successfully secured an paradigm using Fill Furnishings in MS Give-and-take.
Method 6: Lock an Epitome Using Header and Footer
Finally, in this final method, nosotros'll guide y'all on how to lock an prototype using the Header and Footer section. This is particularly useful if the image that you want to lock in place are logos for corporate documents.
Hither's how to practice just that.
Step i: Open an MS Word certificate.
To beginning, yous first demand to open up up a word document. You tin use the file you are currently working on if you lot have one opened already. Don't worry if you don't take a Discussion file ready because creating a new one is equally easy equally i click.

Step 2: Insert your image in the header or footer.
Once you have your document ready, double-click on the Header or Footer department of your document. The header is the topmost surface area of the file where the header or title is usually placed. Meanwhile, the footer section is institute at the bottom part of the certificate, where nosotros usually see folio numbers.

Once the Header or Footersection is enabled, the Design tab will be visible on the Ribbon. From there, select the Picture button under the Insert group. Then, locate and insert the prototype that you want to use.

Finally, double-click on the gray function of your MS Word window to close the Header and Footer department.

Voila! Yous've merely locked an image using the Header and Footer section in MS Word.
Deleting a Locked Image in MS Word
For the first and 2nd methods, you can simply click on the image and hit the Delete key on your keyboard to delete the prototype.
Deleting the image you locked using Method 3 won't exist complicated equally long every bit yous know the password. Y'all merely accept to click on the Protect push under the Review tab and select Restrict Editing. It will launch a carte du jour on the side of the screen. From there, just click on Stop Protection so enter the password you lot used to enforce protection to the document. After removing the document'due south protection, simply delete the image by selecting information technology and pressing the Delete central..
Meanwhile, to delete a watermarked prototype, simply click on the Watermark button nether the Blueprint tab. So, select the Remove Watermark option. If you used the Fill up Effects tool, simply go back to the Folio Color option on the Design tab, and so select No Color.
Lastly, to remove a locked paradigm in the Header and Footer section, access the Header and Footer section, click the epitome and press the Delete cardinal on your keyboard.
Decision
Y'all've finally reached the cease of this tutorial. Hopefully, the methods we provided in this guide helped you lot figure out how to lock an image in MS Give-and-take. Earlier you lot get out, allow us to give y'all a quick refresher of what we accept discussed today.
We covered half dozen ways to lock an image in a Discussion document. The outset method makes utilize of the Picture Ballast Tool, which is by far the easiest method. Second is by using Picture Content Control. Restrict Editing Option too works, however, it requires you to fix a password to secure the document. Meanwhile, if you want to lock a background image in place or a logo, Fill Effects, Watermark, and the Header and Footer tools can get the job done.
That's the residual of it. We hope you plant this commodity helpful!

How To Lock Word Logo And Addres As Letterhead Template,
Source: https://officebeginner.com/msword/how-to-lock-an-image-in-word/
Posted by: pullinsciarger.blogspot.com
0 Response to "How To Lock Word Logo And Addres As Letterhead Template"
Post a Comment